Biicode-logo
  • Explore
  • Plans
  • Learn
    • Get Started
    • Downloads
    • Docs
    • Blog
    • Forum
  • Log in
C/C++ Arduino Raspberry Pi (cross compiling) Node.js
  • Biicode
    • Installation
      • Install Biicode
      • Install C/C++ tools
      • Debian based distributions
      • Arch based distributions
      • Run biicode from source
      • Install C/C++ tools manually
        • Verify your installation
      • Connect through a proxy server
    • Getting started
      • Basics
      • Create your first project
        • [optional] Keeping #includes short
      • Using an IDE
      • Build and run
      • Publishing
    • Dependencies
      • Dependencies
      • Modifying the version you depend on
        • Depending on a block track
    • Publishing
      • Tag a version
      • Private blocks
    • Custom build configuration
      • CMake basics
      • Where is biicode´s “magic”?
      • Define and prepare targets
        • Which source code files are part of the block’s library
        • Choose STATIC or SHARED library
        • Modify which executable targets are made
        • Which source code files are part of each executable
        • Modify which test targets are made
      • Configure targets
        • Configure library target
        • Configure executable target
      • Select build type: Debug or Release
      • Complete variable reference
    • Adapt your library
      • Concepts to understand
        • Key facts
      • Without a previous CMakeLists.txt
        • 1. Look for unresolved dependencies with bii deps
        • 2. Execute bii build
        • 3. Test the libary’s reusability
      • With a previous CMakeLists.txt
        • Option 1: Let biicode do its job in an isolated file
        • Option 2: Build your own target library and link them to BII_LIB_TARGET
        • Option 3: Adapt your CMakeLists.txt filtering files
    • Advanced Usage
      • Custom Layouts
        • Simple Layout
        • TMP Layout
        • Classic Layout
        • CLion Layout
      • Tests
      • Open multiple blocks
        • Working with your own blocks
        • Opening your block
        • Publishing updated code
        • Closing edited block
        • Working with any published block
        • Open a block
        • Publish the changes
        • Close the block
        • Depend on the block you’ve just published
      • Toolchains
      • Override a dependency
        • Override a dependency with block tracks
      • Advanced build configuration
        • Publish, share and reuse CMake scripts
        • Overriding dependencies build options and configuration
      • Publish a block track
        • Publish a new block Track
      • Private blocks
    • Examples
      • Basic Compression Library
        • Simple Huffman Compression - Uncompression
        • Open and build
      • Boost Libraries
        • Boost.Lambda
        • Boost.Coroutine
        • Alternative setup call
        • Extra configuration variables
        • Contribute to the setup scripts
      • Box2D
        • Bounces of a circle falling
        • Open and build
      • C++ challenge
        • Create a new project
        • Copy the code
        • Find and retrieve dependencies
        • Build and run
      • CImg
        • Tron game
        • Open and build
      • Crypto++
        • Encrypt a message
        • Open and build
      • CSparse
        • Read a matrix and solve a linear system
        • Create a new project
        • Open and build
      • cURL
        • HTML page gatherer
        • Open and build
      • Eigen
        • Middle rows from a matrix
        • Open and build
      • Expression Parser
        • Simple form of mathematical expression parsing
        • Open and build
      • fit
        • Tests
      • Flatbuffers
        • Charge a *.fbs file and generate a C++ header
      • Freeglut
        • 1. Create a new project
        • 2. Creating reusable code
        • 3. Find dependencies
        • 4. Build and run
      • GLFW
        • Running the examples
      • GLUI User Interface Library
        • GLUI Window Template
      • Google Mock (GMock)
        • GMock Examples
        • Mocking a simple function
      • Google Test (GTest)
        • Testing a factorial function: Simple test
        • Testing a factorial function: Test suites
        • Open and build
      • HTTP Server
        • How does it work?
        • How can I use it?
        • The code
        • Supported Operating Systems
        • More information
        • List of dependencies
      • json11
        • Simple convert data to json and vice versa
      • json++
        • Simple parser and converter from JSON to XML
      • Miniutf
      • Multivariate Splines
      • libuv
        • Http client/server application
        • Change libuv’s version
      • Little CMS
        • ICC Profile Examples
        • Open and build
      • Log4z
        • Fast stream log strings test
      • lwan Web Server
        • Hello World Example
      • MiLi
      • MuParser
      • OpenCV
        • Showing an image and detecting faces
        • Open and build
      • OpenSSL
        • Encrypting with MD5 and SHA1
        • Develop your project
        • Open and build
      • POCO
        • PDF example
        • Using NetSSL_OpenSSL or NetSSL_Win library
      • PTypes
      • SDL
        • Graphical window interface
        • Open and build
      • SQLite
        • Shopping list database
        • SQLite++ Wrapper
        • Open and build
      • TinyThread++
        • Open and build the examples
        • Simple Hello World with a thread
        • Draw a fractal
      • Zlib
        • Usage example (difficulty: medium)
      • ZMQ
        • Simple client-server with C++ binding
      • ZMQ with Google Protocol Buffers Serialization
    • Integrations
      • Generators and IDEs
        • Eclipse CDT
        • Visual Studio
        • CLion
      • IDEs and VCS
      • Git (GitHub, Bitbucket, etc.)
        • With a new repository
        • Create a block from a git repository
        • Publish from git commit
      • Continuous Integration
        • AppVeyor
        • Travis CI
      • Koding
      • Doxygen
        • Create a Doxyfile template
        • Edit your Doxyfile
        • Generate the Documentation
    • Reference
      • biicode.conf: configure your biicode projects
        • [requirements]
        • [parent]
        • [paths]
        • [dependencies]
        • [mains]
        • [tests]
        • [hooks]
        • [includes]
        • [data]
      • Commands
        • bii build: build your project
        • bii buzz: init, find and build
        • bii clean: delete meta-information
        • bii close: finish editing published blocks
        • bii configure: configure your project
        • bii deps: show block dependencies
        • bii diff: compare block versions
        • bii find: find your external dependencies
        • bii init: creates a new project
        • bii new: creates new blocks
        • bii open: edit published blocks
        • bii publish: publish your blocks
        • bii setup: install necessary tools
        • bii test: test your code
        • bii update: update a block
        • bii user: specify your username
      • Configuration Files
        • layout.bii: define your project layout
        • policies.bii: defining the policies for the code you want to reuse
        • ignore.bii: filtering your files
        • settings.bii: defining your tools and preferences
        • types.bii: configuring non-standard file extensions
    • Release notes
    • FAQs
      • Is biicode free?
      • Is biicode an editor in the cloud?
      • Is biicode a VCS?
      • Can I use biicode with my favourite VCS?
      • Which languages are supported?
      • How does biicode relate to Maven, NPM, PyPI...?
    • Troubleshooting
      • Eclipse projects: “Launch failed. Binary not found” (OS X)
      • g++ doesn’t compile simple code, using thread header
      • Default Build Configuration with bii build not working
  • Arduino
    • Installation
      • Install Biicode
      • Install Arduino tools
      • Install Arduino tools manually
        • Install Arduino SDK manually
    • Getting started
      • Installing biicode and Arduino tools
      • Create your project
      • Define your board
      • Build and upload your program
      • Depending on Fenix Blink
      • Build and upload
    • Arduino commands
      • bii configure -t arduino: configure your project
      • bii build: build your project
      • bii arduino:upload: send your code into the Arduino
      • bii arduino:settings: configure your Arduino settings
      • bii arduino:monitor: start a serial monitor
      • bii configure –toolchain=arduino: enable, disable or change the Arduino cross compilation
    • How to
      • Eclipse IDE configuration
        • How to import your project
        • How to fix “Unresolved inclusion: Arduino.h”
      • Configure your SDK, port and board
        • I changed my Arduino’s port, what happens now?
        • How can I change my Arduino project properties?
        • bii arduino:settings options
      • How to adapt your code
        • 1. Projects with one single .ino file
        • 2. Projects with multiple .ino files
      • How to use the Arduino Yun
        • Download Arduino 1.5
        • Configure your settings
    • Examples
      • Arduino Serial Monitor
        • C++ code
        • Turn ON/OFF one LED
      • Servo and LCD 2x16
        • What do we need?
        • Scheme
        • The code: Display the servo angle into a LCD
        • Build and upload the code
      • Arduino Serial Interface
        • How does it work?
        • How do I use it?
        • C++ code
        • Arduino code
        • Build and run!
    • Troubleshooting
      • Launching Arduino IDE, I get an error ./arduino: 22: ./arduino: java: not found in Ubuntu
  • Raspberry Pi Cross Compilation
    • Installation
      • Install Biicode
      • Install RPI tools
      • Install RPI cross-compiling tools manually
        • C++ tools installation
        • Raspberry Pi tools installation
    • Getting started
      • 1. Installing biicode and C/C++ cross-building tools
      • 2. Create your project
      • 3. Build and run your program (cross-compiling)
      • 4. Send your executable to your Raspberry Pi
      • 5. Depending on WiringPi
    • RPi commands
      • bii rpi:send: send a bin folder
      • bii rpi:settings: configure your Raspberry Pi settings
      • bii rpi:ssh: connect by ssh with the Raspberry Pi
      • bii configure –toolchain=rpi: enable, disable or change the Raspberry Pi cross compilation.
    • How to
      • Installing the biicode package from downloads page is too slow
      • Output selection and volume control
      • Raspberry Pi GPIO Pin Layout
    • Examples
      • WiringPi: C GPIO library
        • How to make a LED blink with Raspberry Pi
        • How to use the RPi PWM output to control a motor
        • How to use softServo to control a Servo
      • HTTP Server: how to control a led by web
        • How can i use it?
      • A funny moving doll with Raspberry PI and biicode
        • You just need paper, scissors, a servo, a Raspberry Pi and biicode!
        • Choose the paper doll you like most
        • Putting it all together!
        • Stick the head to the servo and put the servo in the body
        • Connect the servo to the 5v, GPIO17 and 0v pins
    • Troubleshooting
      • Is it possible to change the version of gcc used for cross-compiling to the Raspberry Pi?
  • Node.js
    • Getting started
      • 1. Installing biicode and node.js
      • 2. Create your project
      • 3. Run your program
      • 4. Depending on redis
    • How to
      • Run your node programs
  • biicode docs
  • Raspberry Pi Cross Compilation
  • Examples
  • HTTP Server: how to control a led by web
  • Edit on GitHub
WiringPi: C GPIO library
A funny moving doll with Raspberry PI and biicode

HTTP Server: how to control a led by web

This example use the HTTP Server library to control a LED.

How can i use it?

  • Just copy the following files to a new block.
  • Find the dependencies and execute your code:

Once you have the code, invoke bii find to resolve external dependencies. Then, build and run in your Raspberry Pi as usual. Remember, the generated binary only work on your Raspberry Pi and have to run as sudo because it works on the hardware:

$ bii find
...
$ bii configure --toolchain=rpi
...
$ bii build
...
$ bii rpi:send
...
$ bii rpi:ssh
...
pi@raspberrypi ~ $ cd [project_name]
pi@raspberrypi ~/[project_name] $ ls
[binary_name]
pi@raspberrypi ~/[project_name] $ sudo ./[binary_name]
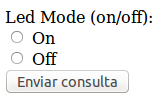
  • Open your web browser and go to http://localhost:9000
../../_images/httpserverrpi.png

main_server.cpp

This file just instances the server and run it with a simple configuration parameters.

 1
 2
 3
 4
 5
 6
 7
 8
 9
10
11
12
13
14
15
16
17
#include "lasote/httpserver/http_server.h"
#include "my_http_middle_ware.h"

using namespace httpserver;
using namespace gip;

int main(){
	MyHttpMiddleware my_mmiddleware;
	HttpServerConf conf(9000, 300, 60, 5);

	HttpServer http_server;

	http_server.run(&my_mmiddleware, &conf);

	return 0;

}

my_http_middle_ware.h

Defines your HttpMiddleware subclass.

 1
 2
 3
 4
 5
 6
 7
 8
 9
10
11
12
13
14
15
16
17
18
19
20
#pragma once

#include "lasote/httpserver/http_middleware.h"
#include "led.h"

namespace httpserver {

	class MyHttpMiddleware : public HttpMiddleware {
		public:
			MyHttpMiddleware() : HttpMiddleware(NULL){}
			MyHttpMiddleware(HttpMiddleware* other_middleware) : HttpMiddleware(other_middleware){

			}
			virtual ~MyHttpMiddleware();
			virtual void call(Request&, Response&);
		private:
			Led myLed;
	};

} /* namespace httpserver */

my_http_middle_ware.cpp

Implements HttpMiddleware subclass. With the call method you can turn on or turn off a LED using the request info of the request.

 1
 2
 3
 4
 5
 6
 7
 8
 9
10
11
12
13
14
15
16
17
18
19
20
21
22
23
24
25
26
27
28
29
30
31
32
33
34
35
36
37
38
39
40
41
42
43
#include "my_http_middle_ware.h"
#include "lasote/httpserver/exception.h"
#include "lasote/httpserver/model/method.h"
#include "sstream"
#include "iostream"

namespace httpserver {

    MyHttpMiddleware::~MyHttpMiddleware(){

    }
    	
    void  MyHttpMiddleware::call(Request&  request,  Response&  response){
    	ostringstream  html;
        string checkedOn = "", checkedOff = "";

    	html  <<  "<!DOCTYPE html>\n<html>\n<body>\n";

    	if(request.get("mode") == "on"){ myLed.on(); checkedOn = "checked";}
    	if(request.get("mode") == "off"){ myLed.off(); checkedOff = "checked";}
    		
    	//Build the html form
    	string  form;
    	form  =  "\
    				<form name='formulary' action='/hello' method='POST'>\n\
    						Led Mode (on/off): <br>\n\
    					<input type='radio' name='mode' value='on' " + checkedOn + "> On<br>\n\
    					<input type='radio' name='mode' value='off' " + checkedOff + "> Off<br>\n\
    					<input type='submit''/>\n\
    				</form>\n\
    				";

    	html  <<  form  <<  "</body>\n</html>\n";

    	// Set content type we are printing
    	response.content_type("text/html");
    	// Set the body
    	response.body  =  html.str();
    }


} /* namespace httpserver */

led.h

Defines a Led class for turn on/off the light.

 1
 2
 3
 4
 5
 6
 7
 8
 9
10
11
12
13
14
15
#pragma once

#include <drogon/wiringpi/wiringpi/wiringpi.h>

class Led
{
	public:
		Led(); //default constuctor
		virtual ~Led(); //default virtual destructor
		void on();
		void off();
		
	private:
		int pin;
};

led.cpp

Implements the Led class

 1
 2
 3
 4
 5
 6
 7
 8
 9
10
11
12
13
14
15
16
17
18
19
20
21
22
23
#include "led.h"

Led::Led()
{
	pin = 0;
	wiringPiSetup () ;
	pinMode (pin, OUTPUT) ;
}

Led::~Led()
{

}

void Led::on()
{
	digitalWrite (pin, HIGH);
}

void Led::off()
{
	digitalWrite (pin, LOW);
}

Download: httpserver.zip

WiringPi: C GPIO library
A funny moving doll with Raspberry PI and biicode

© Copyright 2014, biicode.