

Biicode is a file-oriented Dependencies Manager for C and C++ developers. Install both biicode and the C/C++ tools to get started.
Download Biicode Installer and double-click the downloaded package. Open the terminal and make sure biicode is installed:
~$ bii --version
Check alternative installations for:
Then install required tools like CMake and MinGW or GCC:
~$ bii setup:cpp
Execute again to make sure the tools are installed:
~$ bii setup:cpp
CMake 3.0.2 already installed
gcc 4.8.2 already installed
g++ 4.8.2 already installed
Alternative install for Debian based distributions (Ubuntu, Raspbian)
Use the apt-get program to install biicode through the APT repository:
Quick install:
wget http://apt.biicode.com/install.sh && chmod +x install.sh && ./install.shExecute bii setup:cpp to make sure you’ve got all tools required.Step by step install:
# 1. Create a file named '/etc/apt/sources.list.d/biicode.list' and put the line corresponding to your linux distribution:

Ubuntu 12:
        deb http://apt.biicode.com precise main

Ubuntu 13:
        deb http://apt.biicode.com saucy main

Ubuntu 14:
        deb http://apt.biicode.com trusty main

Debian Wheezy:
        deb http://apt.biicode.com wheezy main


# 2. Add our public key executing:
sudo wget -O /etc/apt/trusted.gpg.d/biicode.gpg http://apt.biicode.com/keyring.gpg

# 3. Execute apt-get update:
sudo apt-get update

# 4. Execute apt-get install:
sudo apt-get -y install biicode

# 5. Execute bii setup:cpp to make sure you've got all tools required.
bii setup:cpp
Alternative install for Archlinux based distributions (Manjaro, Arch Linux ARM, etc)
Biicode maintains a package at the Arch User Repository (AUR). Install it using your preferred package manager:
$ sudo yaourt -S biicode
The package is maintained in the AUR, so your package manager will notify you automatically when we update the package.
The most flexible way to make a package for your distro is running biicode from source. Also, if you are developing biicode, testing new feature or helping to resolve a bug, you may need to run biicode directly from source.
Follow this guide at GitHub to run biicode from source.
Install, set up and verify some tools to build C and C++ projects with biicode.
Follow these steps if something failed during the automatic installation explained before. If you experience any issues, please contact us at our forum, we’ll try to solve your problem as soon as possible.
Linux
Install the required development tools as root:
$ sudo apt-get install build-essential cmake
That’s all!
MacOS
You need to get installed both XCode Developer Tools and CMake:
The XCode Developer Tools
$ xcode-select --install
Download and install the appropriate version of CMake for your Mac OSX.
Windows
To develop C/C++ programs in Windows you need:
CMake. Open Source tool that manages the software building process in a compiler-independent manner.
Compilers and build system. This could be one of the following (among other alternatives):
- MinGW (make sure to include gcc, g++, and mingw32-make with your installation)
- Visual Studio C++
These are the steps for manual installation of our recommended tools:
Download and install CMake. You can download the latest version of CMake here.
Download and install “base, g++” packages of MinGW. Follow this link to get the installer, and choose while installing two additional packages, GCC and G++ package.
Add to your user PATH environment variable the paths to these tools. We recommend Rapid Environment Editor for editing environment variables. Otherwise, go to My Computer, click Properties, click Advanced System Settings and in the System Properties window click the Environment Variables button. then you will see a new window and in User Variables you’ll find the variable PATH:
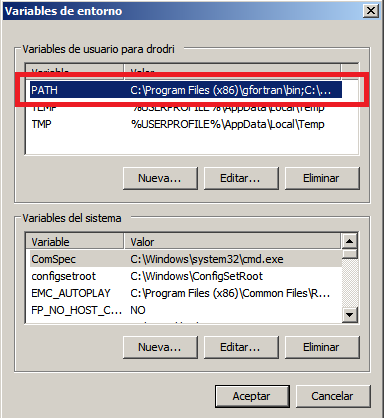
Add your tools binaries folders (i.e. C:\MinGW\bin for MiGW, and C:\Program Files (x86)\CMake\bin for CMake).
You might need to close and open again any cmd windows in order to load the new value for the PATH variable.
To check your automatic installation open the Terminal and type bii setup:cpp. To check your manual installation, run the following commands. If the output messages look similar to these, the tools are successfully installed.
$ cmake --version
cmake version [version]
$ gcc --version
gcc (GCC) [version]
...
$ g++ --version
g++ (GCC) [version]
...
$ mingw32-make --version
GNU Make [version]
...
Set an environment variable “HTTPS_PROXY” with your proxy server address.
Linux/OSx:
$ export HTTPS_PROXY="http://user:pass@proxy_ip:port"
Windows:
- From the Desktop, right-click the very bottom left corner of the screen to get the Power User Task Menu.
- From the Power User Task Menu, click System.
- Click the Advanced System Settings link in the left column.
- In the System Properties window, click on the Advanced tab, and then click the Environment Variables button near the bottom of that tab.
- In the Environment Variables window, click “New” and add variable name HTTPS_PROXY and value “http://user:pass@proxy_ip:port“
Example: If my proxy is on localhost (port 7775) and my user is “lasote” with password “mypp”:
$ export HTTPS_PROXY="http://lasote:mypp@localhost:7775"
If you have any questions, we are available at biicode's forum. You can also write us for suggestions and feedback.